Lighting Control Networking 101
November 3, 2017
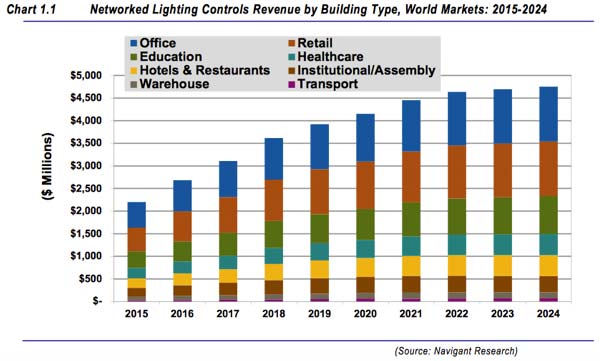
Networked lighting control systems are all the rage these days. Rightfully so, given their enormous capability to control luminaires, energy use — and potentially much more. But what are the major elements that define a networked lighting control system? Understanding this will help the specifier to decide which system to use on a project.
Wired vs. wireless
The biggest buzz word in the controls industry today is probably “wireless”. This means that the lighting control system wirelessly connects components in its network (via radios embedded into each component). Other systems are “wired”, in which case physical wires connect the control system components. Some hybrid systems are designed to connect certain components wirelessly, but others via wires. What is transmitted through this network regardless of whether it’s transmitted wirelessly or through physical wires? Instructions are sent from a central server to luminaires and potentially other devices as well (e.g., thermostats for HVAC systems) — for example to dim, turn on or turn off. Data are returned to the central server; for example, from occupancy sensors, photosensors or switches. The information from those “peripheral” devices goes to the central server, which in turn sends instructions back to luminaires. Additionally, information about the luminaires is returned to the central server; for example, about whether the luminaire is on or off, its dimmed level, power draw based on current dimmed level, etc.
The biggest benefit to using wireless systems is the ease of installation and, therefore, potentially reduced labour cost. Additionally, if the luminaire vendor can pre-install “controllers” as well as sensors on a per-fixture basis, then the electrical contractor only has to connect power wires just as with any other fixture. Plus, they typically don’t have to have any knowledge about networked lighting control systems to complete the installation. One potential drawback to using a control system that connects components wirelessly is that it may be less secure than a wired system. If you’re specifying a control system for a project where the client is extremely sensitive about security, this may not be the best solution. Lastly, wireless signal propagation isn’t always foolproof. The radios used in these components are typically low-power. Plus, the signal may have a hard time travelling long distances and going through interior partitions. It’s very important to heed a vendor’s recommendations for maximum distance between components and gateways.
Using wires to establish a network to connect all components in a lighting control system may provide more security, or at the very minimum more peace of mind to an owner who is concerned about hacking. It may also reduce the potential for the signal to drop out due to propagation problems. However, these wires are invariably low-voltage — typically Ethernet cable or a pair of low-voltage cable such as 18/2 (a pair of 18-gauge wires). As such, they are susceptible to voltage drop over long distances. So the specifier should still heed the vendor’s recommendations for maximum distance between components.
Remember that the network does not transmit “dimming” signals. The network connecting all components only transmits instructions telling luminaires and other devices what to do, and then the luminaires internally tell their ballasts or drivers to dim, etc. (usually using an analog 0-10V signal). As such, the network data is entirely digital. Be aware that there are systems that use centralized controllers that send 0-10V dimming signals to a group of fixtures, but these are the exception to the rule.
Topology
Networks in lighting control systems can be connected in different ways, especially in a wireless system. One of the more prevalent patterns is a “self-healing mesh network”. That means that any “node” (component) can connect to/communicate with any other node. If a particular node isn’t working for any reason at all, the signal simply tries to find another nearby node (hence the “self-healing” phraseology). Some wireless systems use a “star” topology to connect all components to a gateway. (“Gateways” are essentially wireless routers that transmit wirelessly back and forth to components — luminaires, sensors, switches, etc., and are wired back to the central server.) In a star topology, every device must establish a connection to the gateway on its own. Some systems using a star topology allow you to make any device into a “repeater.” The amount of data flow through a system with a star pattern is typically less than in a self-healing mesh network, so there may be an impact on frequency of data transmission, reliability, etc. Using a system with a star topology may reduce the likelihood of having transmission problems. However, if any component’s radio has difficulty connecting with the gateway, some other component in between can be turned into a repeater to help establish the connection.
Wired systems typically use a “daisy-chain” topology to connect components back to either gateways (similarly to a wireless system) or in some cases directly to a central server. In some systems, a strict daisy-chain topology must be maintained — meaning no sub-loops, “T” connections, etc. Other systems allow any type of topology as long as everything is ultimately connected back to a gateway or server. It’s important to note that in both wireless as well as wired systems, it’s common to have more than one “loop” or group of components connected to a gateway or central server. For example, on a large office floor, a wireless system may use four (or more) wireless gateways (obviously depending on size and the number of components). A wired system may have four (or more) “loops” of network wire. That’s why most systems use gateways similarly to any other computer network to manage all of the components that must be incorporated into the overall system (and ultimately connected to a central server).
Software
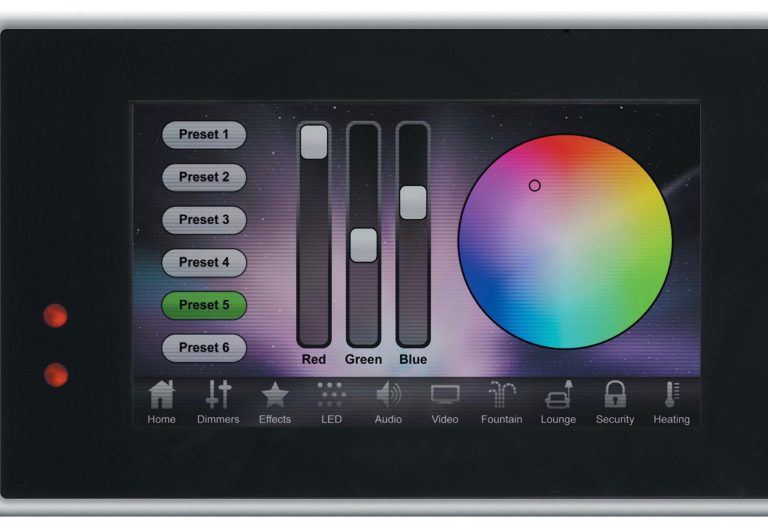
So far, we’ve only touched on the hardware. While that’s important, it’s probably even more impactful to consider how the system’s software works. What is the “UI” like (user interface)? What capabilities does the software have, or not have? Who can access the system, make changes, etc.? As you might imagine, differences in software are only limited by the imagination, so it could take a semester-long class just to scratch the surface in understanding the different approaches taken by vendors.
Fortunately, lighting control systems all have to do more or less the same basic things. For example, they have to take information from sources such as occupancy sensors, photosensors and switches, process that information, then instruct luminaires how to behave. They typically have to provide a timing method (such as NTP, Network Time Protocol) in order to facilitate a scheduling function. Obviously, every system has to have some method to discover devices on its network. However, different systems do sometimes have surprising variations in how they deal with certain aspects of what a lighting control system has to do.
A perfect case in point is “zoning.” Some spaces are fairly simple or fairly small. In those situations, simple zoning may suffice. For example, the space may be divided into a very limited number of zones, in which each component (such as a switch, occupancy sensor or photosensor) belongs to its respective zone as required. What if the space is much larger or much more complex? For example, in a large open-office floor, luminaires in primary and secondary daylight zones must be automatically controlled by photosensors. Additionally, it’s common to use occupancy sensors to achieve the “automatic shutoff” requirement in most codes. It’s becoming commonplace to use a dense pattern of occupancy sensors, but you may only want to use the least amount of photosensors since all luminaires facing a particular exposure can use the information from only one photosensor to dim to appropriate levels. In that case, the “zones” for occupancy sensors may overlap the zones for the photosensors, or vice versa. Not all vendors allow for this complexity of zoning in their software, believe it or not. If they do not, then you might be forced to purchase and install a photosensor in every single occupancy sensor zone.
This is only one example of how the software may be wildly different in different systems, but there are many others. The most important thing is — caveat emptor! If you need the software to behave in very particular ways, it is your responsibility to look for a lighting control system that meets your specifications. There is no standardization for how software works in lighting control systems at this time. So check out the differences in both software and hardware with any systems you are considering for use. That way you should be able to eliminate any surprises once the system has been installed and commissioned.
Steven Mesh is an award-winning lighting designer who has designed lighting and control systems for a variety of project types (commercial, museums, schools, residential, restaurants, retail, historic, healthcare, etc.). As an educator, he has taught classes and given presentations about lighting and controls across North America and internationally. One of his is developing lighting and lighting controls courses that rely on hands-on and/or interactive content. He has been a repeat speaker at LightFair for eight years.
Published with the permission of Lighting Control Association.